css3阴影边框属性怎么设置(前端阴影效果详解附实例代码)
前面两篇文章都有提到过css3阴影属性box-shadow,里面也有很多的基础知识,有看过的小伙伴应该都有或多或少的收获吧,今天我们再从基础入手,希望能让大家更熟悉它。
关键点:
1、外 box-shadow 前四个参数:x 偏移值、y 偏移值 、模糊半径、扩张半径。
2、单侧投影的核心是第四个参数:扩张半径。这个参数会根据你指定的值去扩大或缩小投影尺寸,如果我们用一个负的扩张半径,而他的值刚好等于模糊半径,那么投影的尺寸就会与投影所属的元素尺寸完全一致,除非使用偏移量来移动他,否则我们将看不到任何投影。
<style>
.left {
 box-shadow: -8px 0 5px -5px #333;
}

.right {
 box-shadow: 8px 0 5px -5px #333;
}

.top {
 box-shadow: 0 -8px 5px -5px #333;
}

.bottom {
 box-shadow: 0 8px 5px -5px #333;
}
</style>
<div class='left'>左</div>
<div class='right'>右</div>
<div class='top'>上</div>
<div class='bottom'>下</div>
css3阴影属性知识点:
1、立体文字阴影的关键点在于多层 text-shadow 的叠加
2、合理运用了 SASS 函数来自动计算多层 text-shadow 的 CSS 代码
3、运用了 Sass 的颜色函数,渐进实现层级阴影颜色 - fade-out: 改变颜色的透明度,让颜色更加透明 - desaturate: 改变颜色的饱和度值,让颜色更少的饱和
4、HSL(颜色值)
H:Hue(色调)。0(或360)表示红色,120表示绿色,240表示蓝色,也可取其他数值来指定颜色。取值为:0 - 360
S:Saturation(饱和度)。取值为:0.0% - 100.0%
L:Lightness(亮度)。取值为:0.0% - 100.0%
<style>
@function blessing($color) {
 $val: 0px 0px $color;
 @for $i from 1 through 50 {
 $color: fade-out(desaturate($color, 1%), .02);
 $val: #{$val}, -#{$i}px #{$i}px #{$color};
 }
 @return $val;
}

div {
 text-align: center;
 font-size: 20vmin;
 line-height: 45vh;
 text-shadow: blessing(hsl(0, 100%, 50%));
 color: hsl(14, 100%, 60%);
}
</style>
<div>福</div>
编译后的css(推荐scss在线编译为css工具https://www.sassmeister.com/)
div {
 text-align: center;
 font-size: 20vmin;
 line-height: 45vh;
 text-shadow: 0px 0px #992400,
 1px 1px rgba(152, 36, 1, 0.98),
 2px 2px rgba(151, 37, 2, 0.96),
 3px 3px rgba(151, 37, 2, 0.94),
 ...
 ...
 ...
 49px 49px rgba(116, 56, 37, 0.02),
 50px 50px rgba(115, 56, 38, 0);
 color: #ff6333;
}
从浅到深的学习 CSS3阴影(box-shadow)

从浅到深的学习 CSS3阴影(box-shadow)
知识点
1、借用了元素的两个伪元素
2、通过渐变色填充两个伪元素,再通过位移、变换放置在合适的位置
<style>
div {
 position: relative;
 width: 30vmin;
 height: 30vmin;
 line-height: 30vh;
 text-align: center;
 font-size: 30px;
 background: #fff;
 margin: 30vmin auto;
}

div::before,
div::after {
 content: "";
 position: absolute;
 top: 0;
 left: 0;
 right: 0;
 bottom: 0;
 z-index: -1;
}

div::before {
 content: ':before';
 font-size: 30px;
 text-align: center;
 line-height: 30vh;
 transform-origin: 0 50%;
 transform: translate(100%, 0) skewY(45deg) scaleX(.6);
 background: linear-gradient(90deg, rgba(0, 0, 0, .3), transparent);
}

div::after {
 content: ':after';
 font-size: 30px;
 text-align: center;
 line-height: 30vh;
 transform-origin: 0 0;
 transform: translate(0%, 100%) skewX(45deg) scaleY(.6);
 background: linear-gradient(180deg, rgba(0, 0, 0, .3), transparent);
}
</style>
<div>Web秀</div>
知识点
1、阴影实现的关键点在于使用伪元素绝对定位在容器的一角,元素本身透明,阴影扩散开形成内切圆角效果
2、阴影实现缺点,单个标签最多只能是2个内切圆角
3、径向渐变实现内切圆角可以是4边
<style>
div {
 position: relative;
 width: 20vw;
 height: 8vw;
 margin: 1vw auto;
 border-radius: 1vmin;
 overflow: hidden;
 line-height: 8vw;
 color: #fff;
 text-align: center;
}

.shadow::before {
 position: absolute;
 content: "";
 top: -2vw;
 left: -2vw;
 width: 4vw;
 height: 4vw;
 border-radius: 50%;
 box-shadow: 0 0 0 15vw #e91e63;
 z-index: -1;
}

.shadow::after {
 position: absolute;
 content: "";
 bottom: -2vw;
 right: -2vw;
 width: 4vw;
 height: 4vw;
 border-radius: 50%;
 box-shadow: 0 0 0 15vw #e91e63;
 z-index: -1;
}

.linear {
 background-size: 70% 70%;
 background-image:
 radial-gradient(
 circle at 100% 100%,
 transparent 1vw,
 transparent 2vw,
 #03A9F5 2vw),
 radial-gradient(
 circle at 0 0,
 transparent 0,
 transparent 2vw,
 #03A9F5 2vw),
 radial-gradient(
 circle at 100% 0,
 transparent 0,
 transparent 2vw,
 #03A9F5 2vw),
 radial-gradient(
 circle at 0 100%,
 transparent 0,
 transparent 2vw,
 #03A9F5 2vw);
 background-repeat: no-repeat;
 background-position:
 right bottom,
 left top,
 right top,
 left bottom;
}
</style>
<div class="shadow">阴影实现缺点最多是2边</div>
<div class="linear">径向渐变内切圆角4边</div>
从浅到深的学习 CSS3阴影(box-shadow)
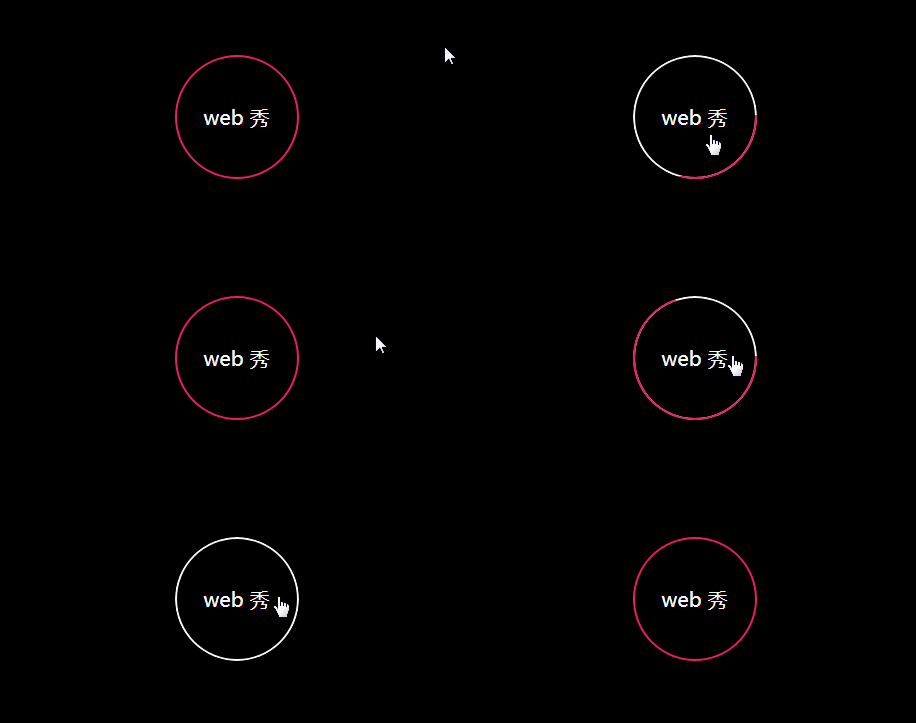
知识点:圆环进度条的移动本质上是阴影顺序延时移动的结果。
<style>
body {
 background: #000;
}

.container {
 position: relative;
 overflow: hidden;
 width: 124px;
 height: 124px;
 overflow: hidden;
 margin: 100px auto;
 border-radius: 50%;
}

.shadow {
 position: absolute;
 top: 50%;
 left: 50%;
 transform: translate(-50%, -50%);
 width: 120px;
 height: 120px;
 line-height: 120px;
 border-radius: 50%;
 color: #fff;
 font-size: 20px;
 cursor: pointer;
 box-shadow:
 60px -60px 0 2px #e91e63,
 -60px -60px 0 2px #e91e63,
 -60px 60px 0 2px #e91e63,
 60px 60px 0 2px #e91e63;
 text-align: center;
}
.shadow:hover {
 animation: border 0.5s ease forwards;
}

@keyframes border {
 0% {
 box-shadow:
 60px -60px 0 2px #e91e63,
 -60px -60px 0 2px #e91e63,
 -60px 60px 0 2px #e91e63,
 60px 60px 0 2px #e91e63,
 0 0 0 2px transparent;
 }
 25% {
 box-shadow:
 0 -125px 0 2px #e91e63,
 -60px -60px 0 2px #e91e63,
 -60px 60px 0 2px #e91e63,
 60px 60px 0 2px #e91e63,
 0 0 0 2px #fff;
 }
 50% {
 box-shadow:
 0 -125px 0 2px #e91e63,
 -125px 0px 0 2px #e91e63,
 -60px 60px 0 2px #e91e63,
 60px 60px 0 2px #e91e63,
 0 0 0 2px #fff;
 }
 75% {
 box-shadow:
 0 -125px 0 2px #e91e63,
 -125px 0px 0 2px #e91e63,
 0px 125px 0 2px #e91e63,
 60px 60px 0 2px #e91e63,
 0 0 0 2px #fff;
 }
 100% {
 box-shadow:
 0 -125px 0 2px #e91e63,
 -125px 0px 0 2px #e91e63,
 0px 125px 0 2px #e91e63,
 120px 40px 0 2px #e91e63,
 0 0 0 2px #fff;
 }
}
</style>
<div class="container">
 <div class="shadow">web 秀</div></div>
</div>
原文地址:https://tangjiusheng.cn/css3/1107.html

